


Step 1: Get Microsoft Azure
Get the GitHub Student Developer Pack.
Now navigate to the benefits page and apply a filter for
cloudor just click here. Follow the steps to sign up for Azure, and you will receive $100 credits.
Note
Although, we could have done it directly using Institute ID on Microsoft Azure. But the afore-mentioned method exposes you to various other possibilities which you might have not even thought of. We chose Microsoft Azure here, if you want you can also choose DigitalOcean or any other cloud platform of your preference.
Step 2: Create an EC2 instance
Goto Azure portal
Click on the
hamburgermenu >Create a resource>Compute>Ubuntu Server 22.04 LTS. Fill in the necessary details in theBasicssection.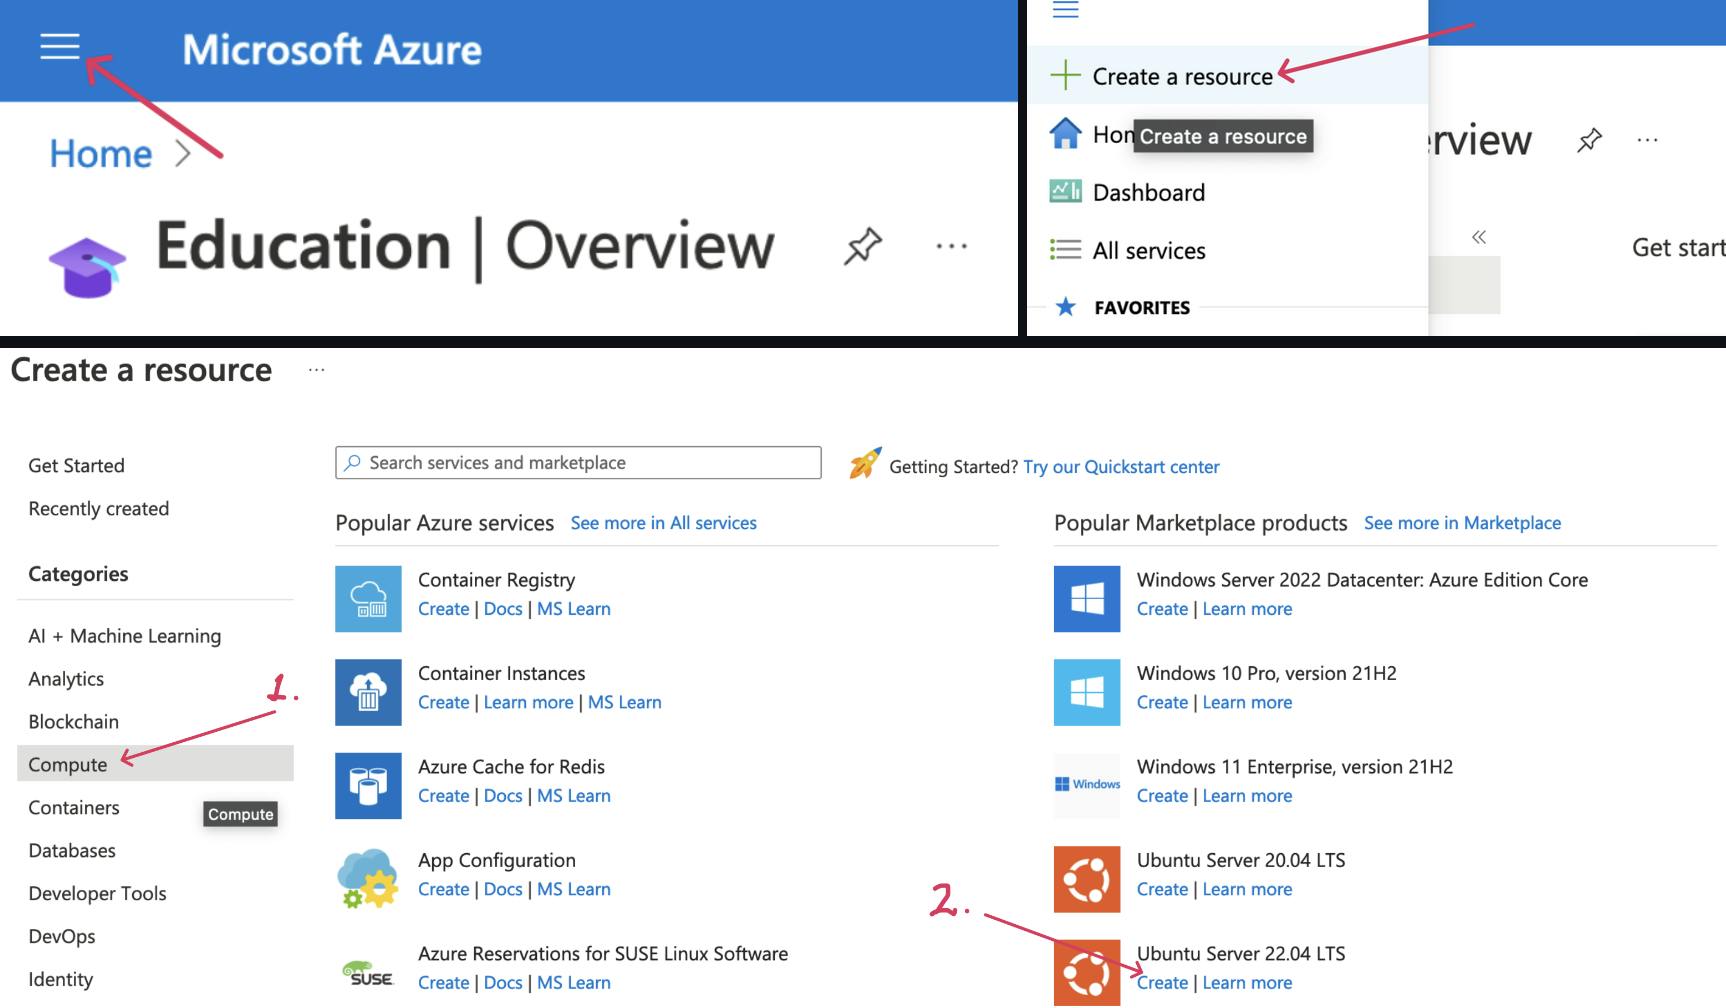
Create a new
Resource Group& give your virtual machine a name.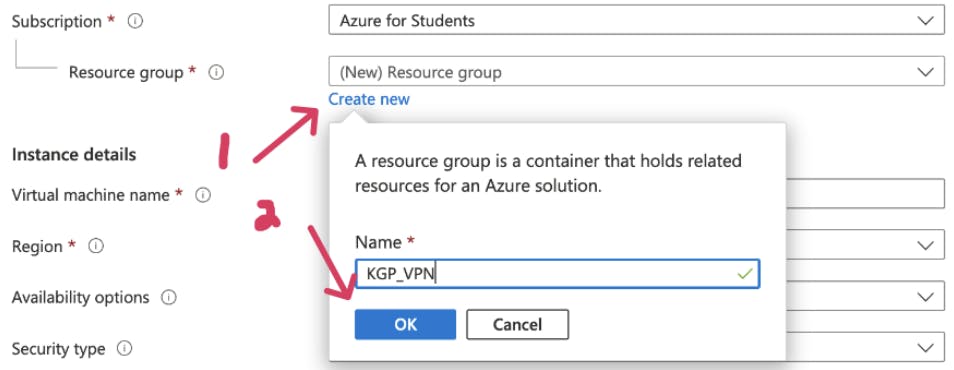
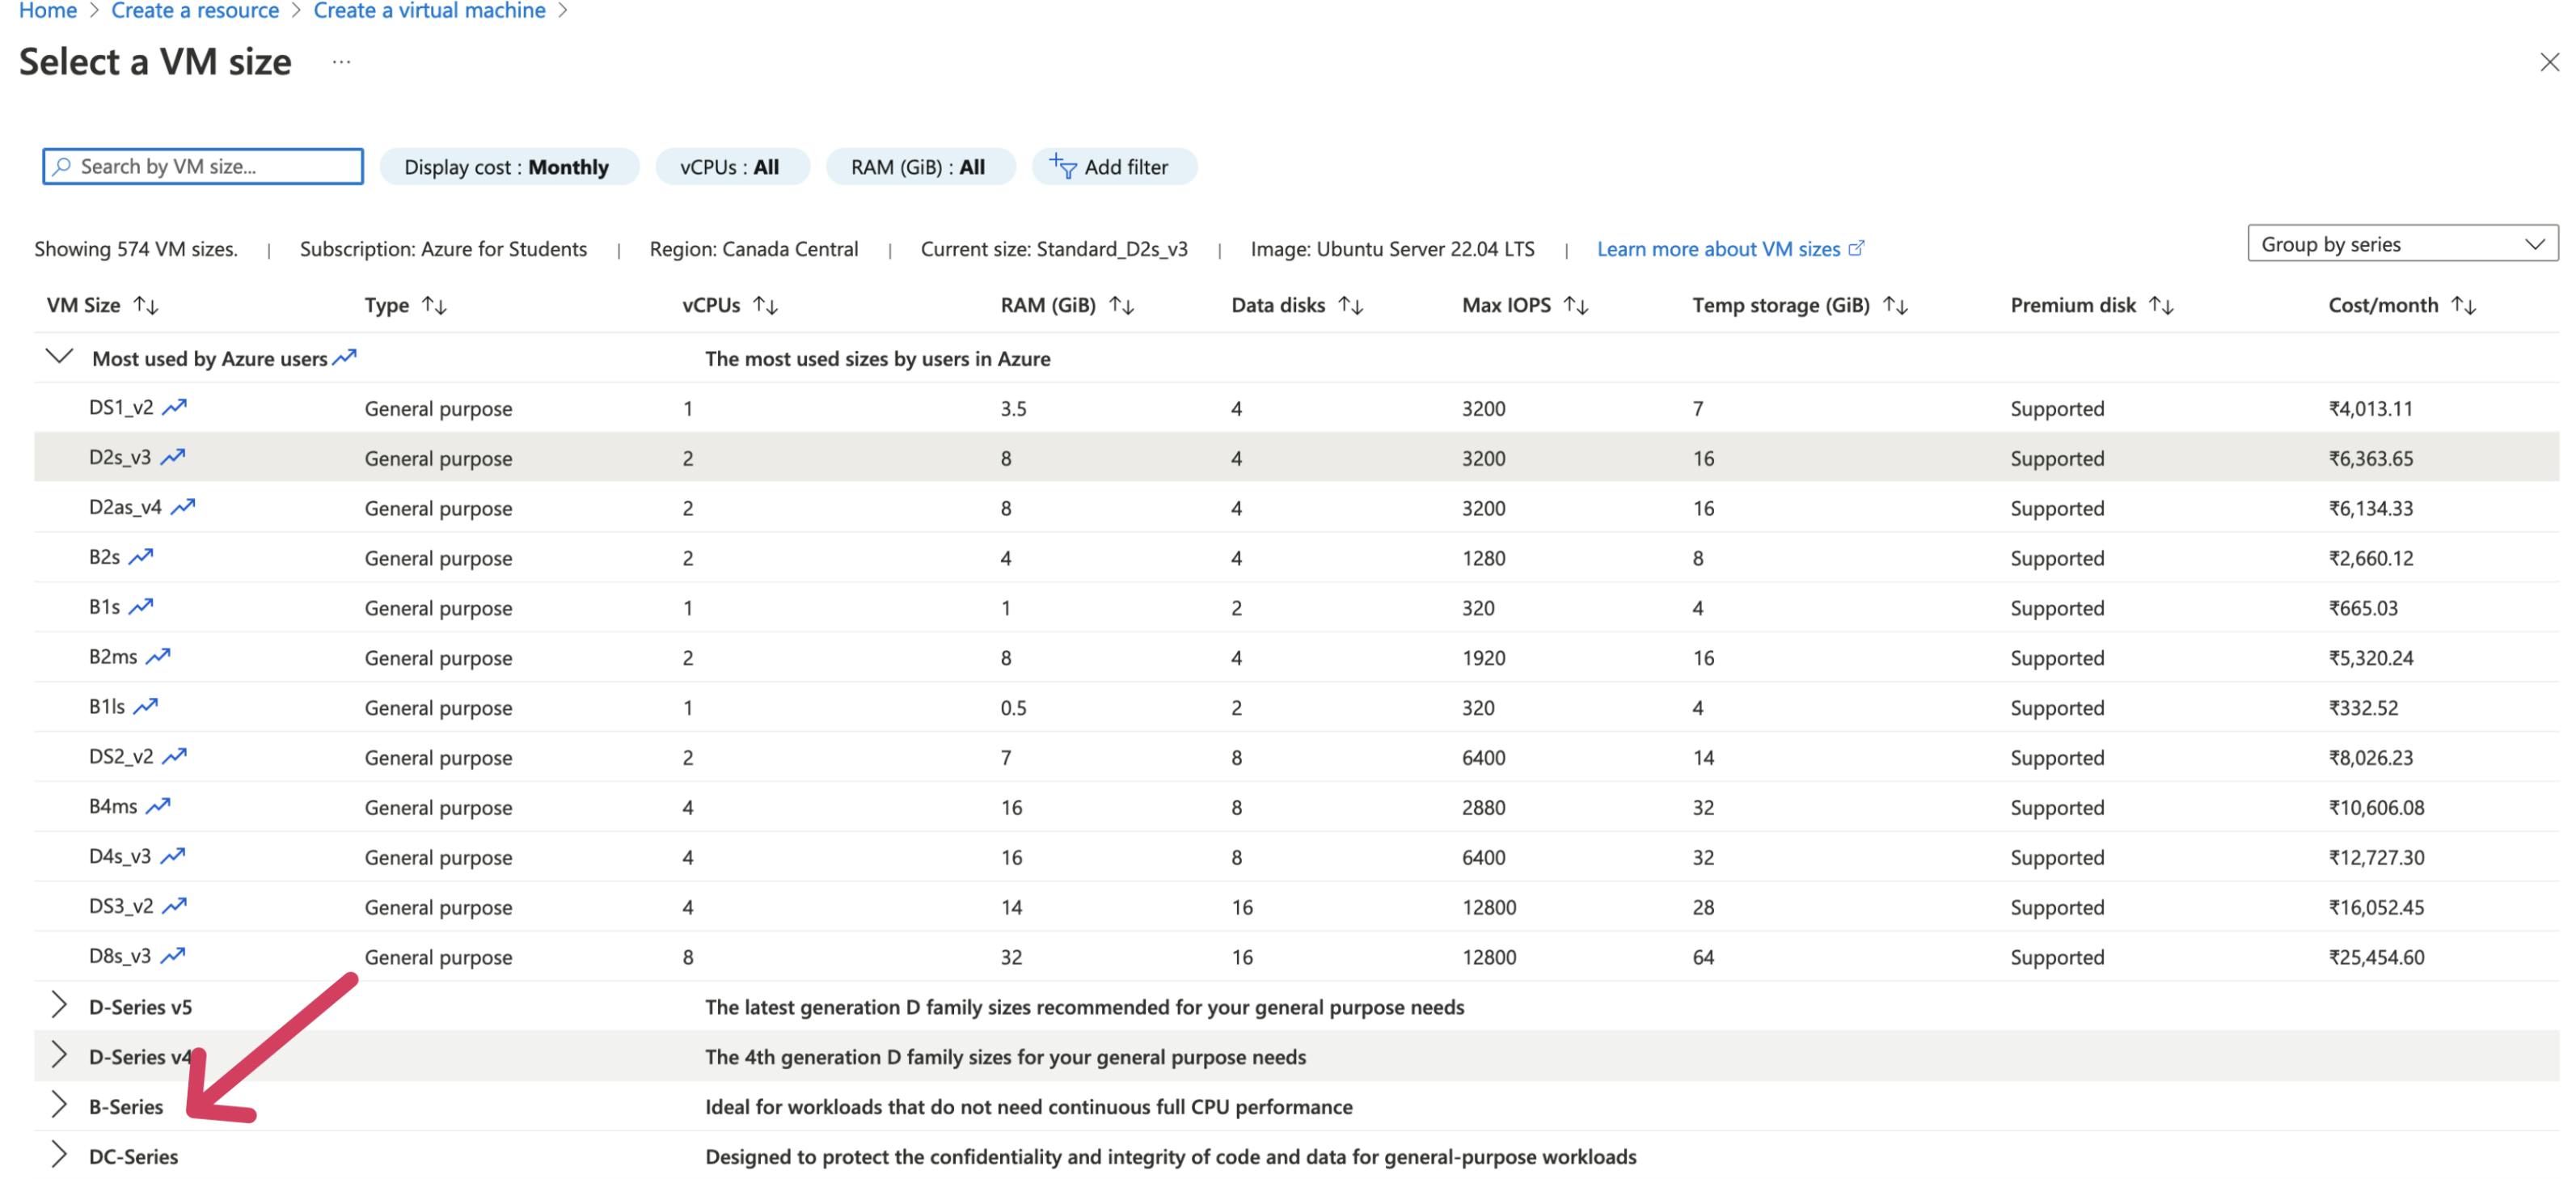
Now about region & disk size.
First, select the cheapest size and then select the region from the available options. A standardB1size is going to be good enough and will last around 11 months using free credits. Now choose the closest region where the said size is available, which in our case will beSouth-East Asia. A bigger (aka more costly) size would probably be available in Indian regions. Follow the steps shown in the images below.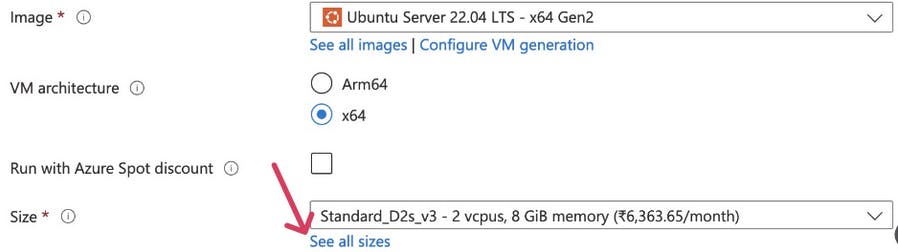
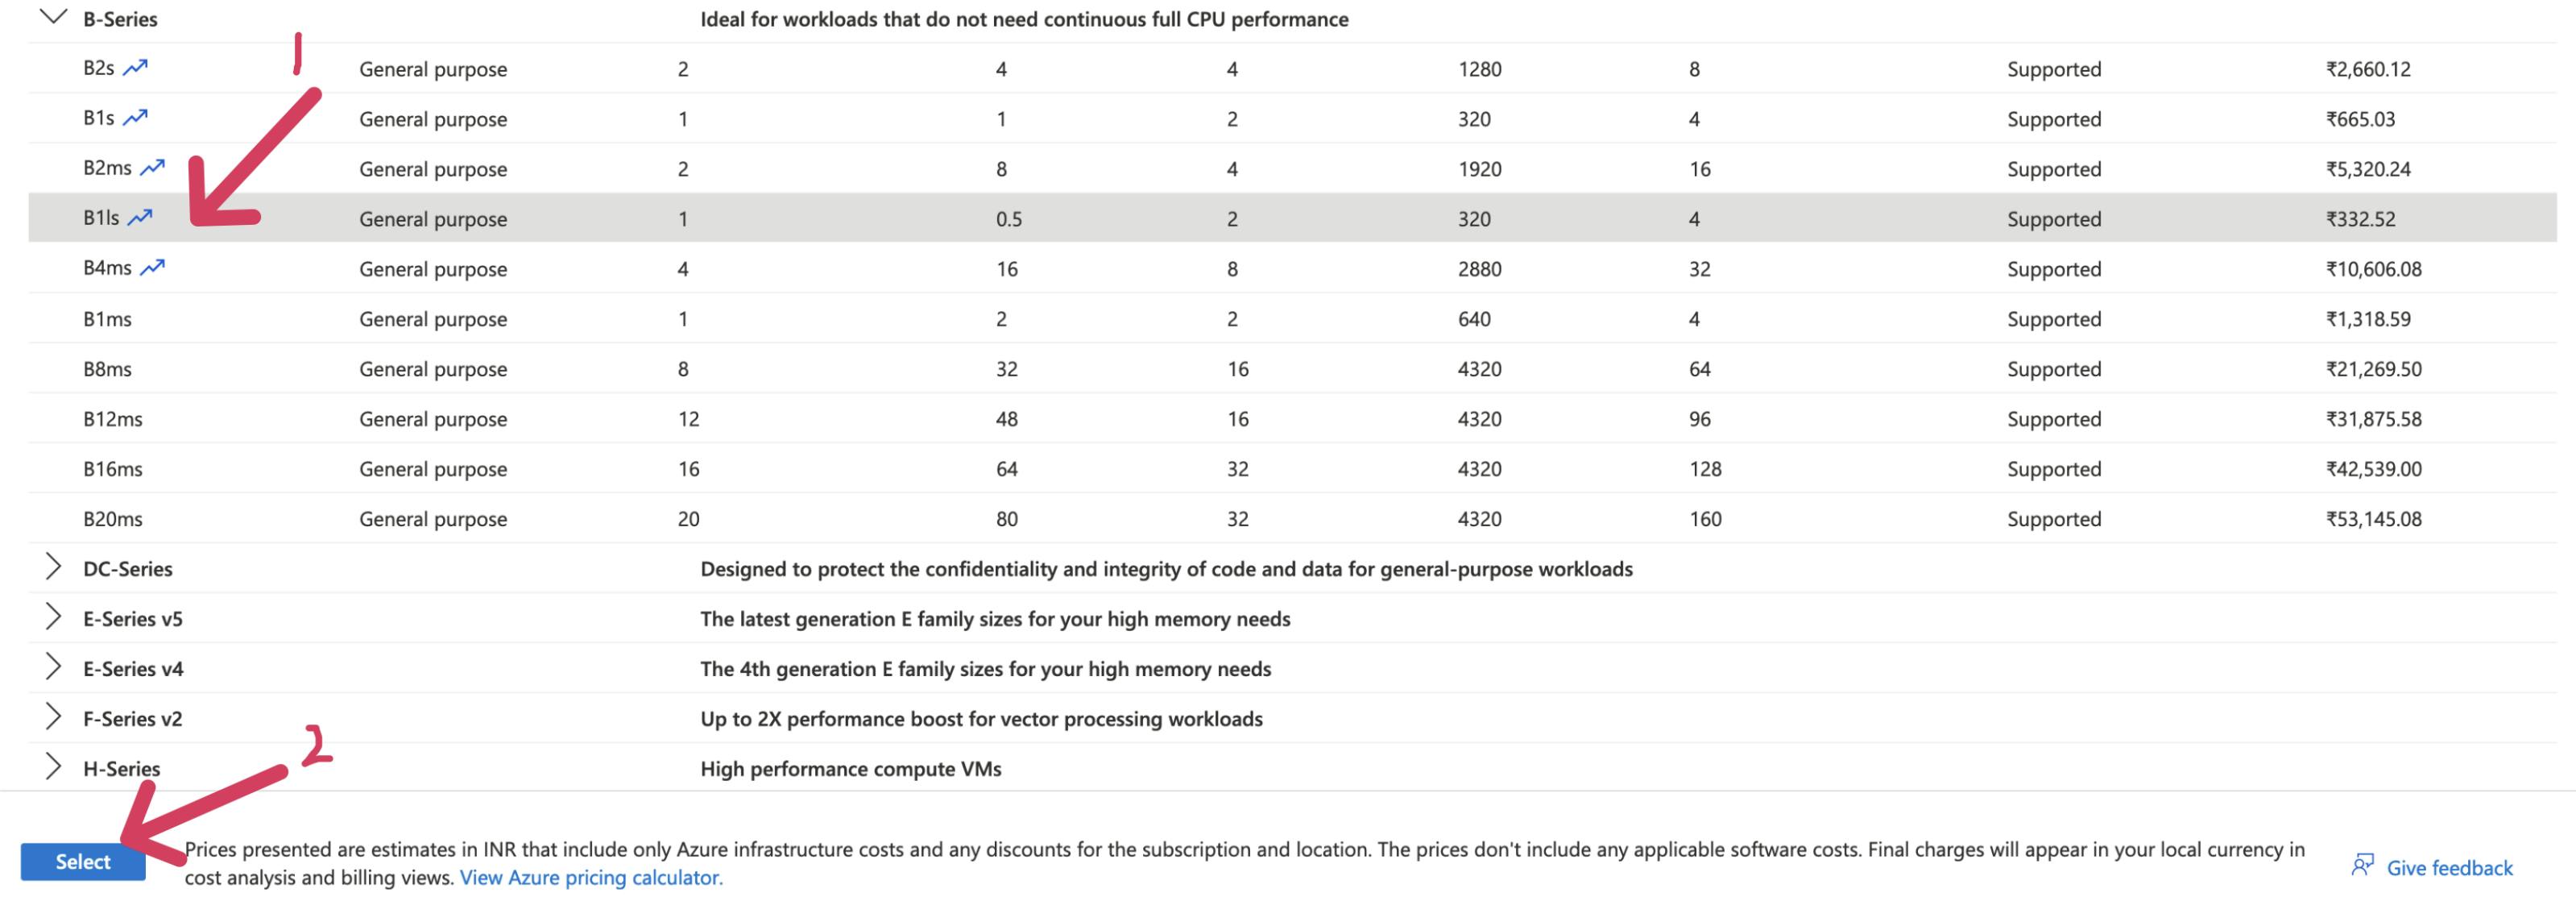

Select
Passwordas the Authentication Method and fill in the required fields.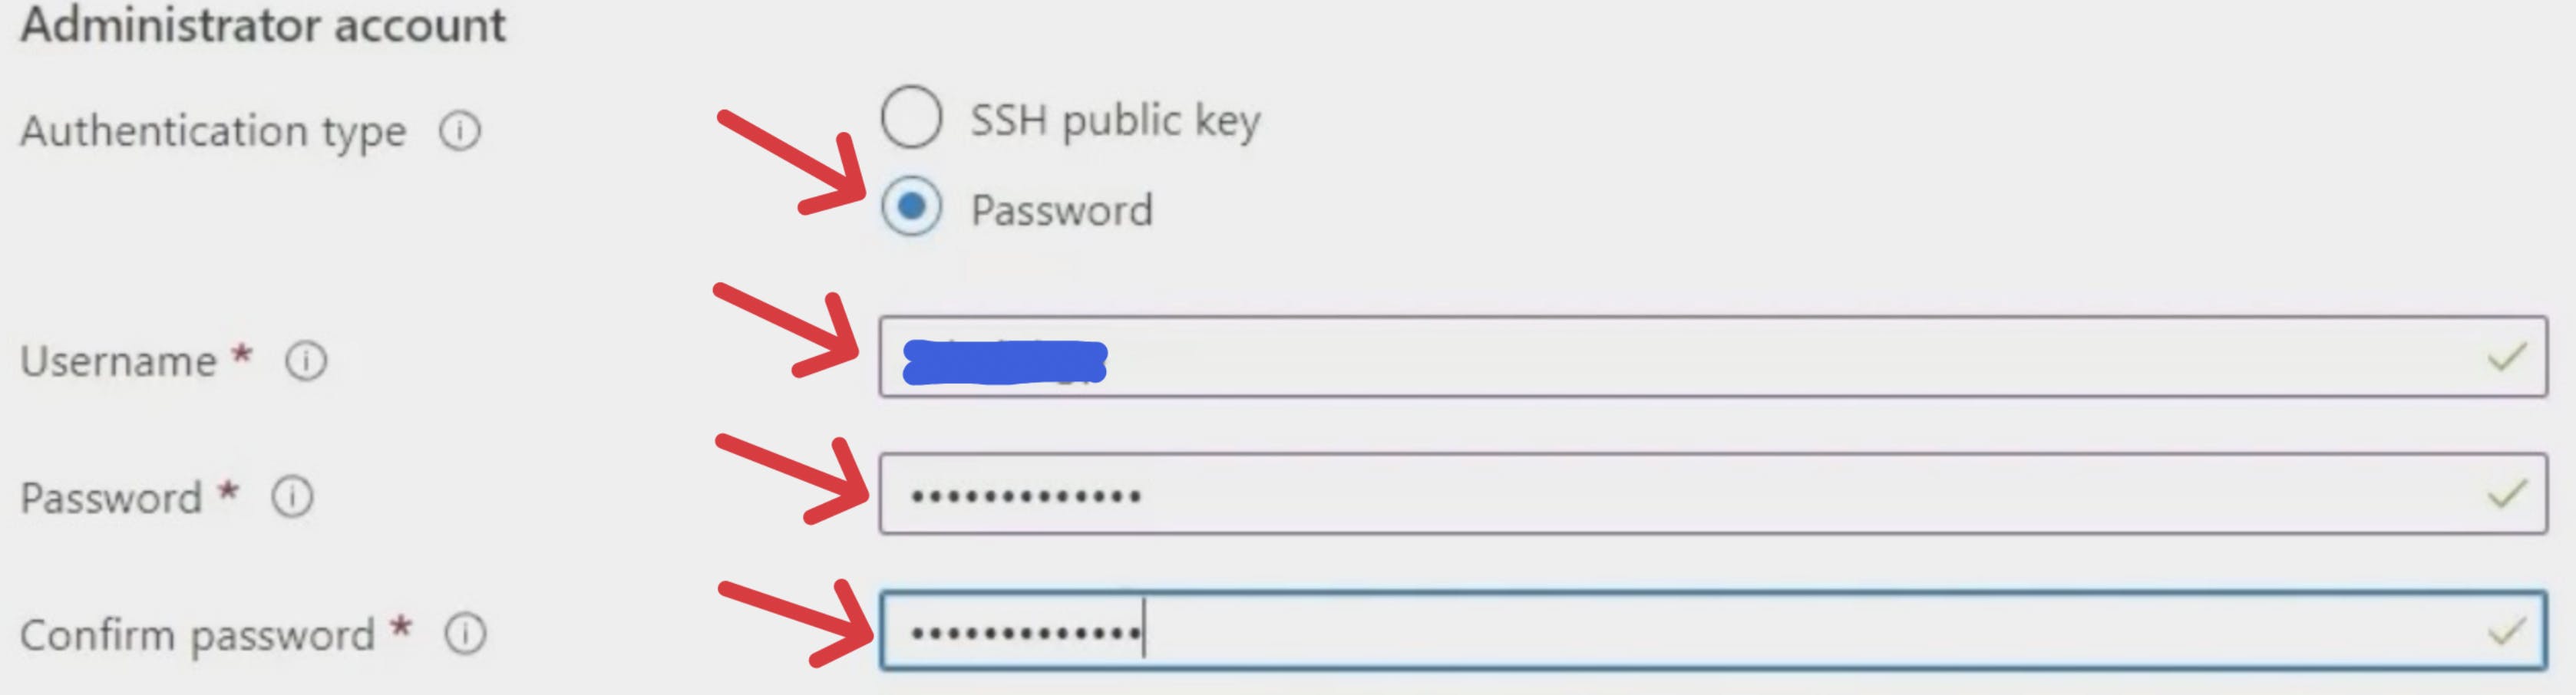
Note
Though using a password as the authentication method is easy to follow, it is equally less secure. It is recommended to usesshas the authentication method. It is indeed tougher, to follow the ssh path that's why it is not mentioned in this blog post, you can refer to my gist for the Steps to set up the server via SSH public keys.Choose HTTPS(443) in
Select inbound ports.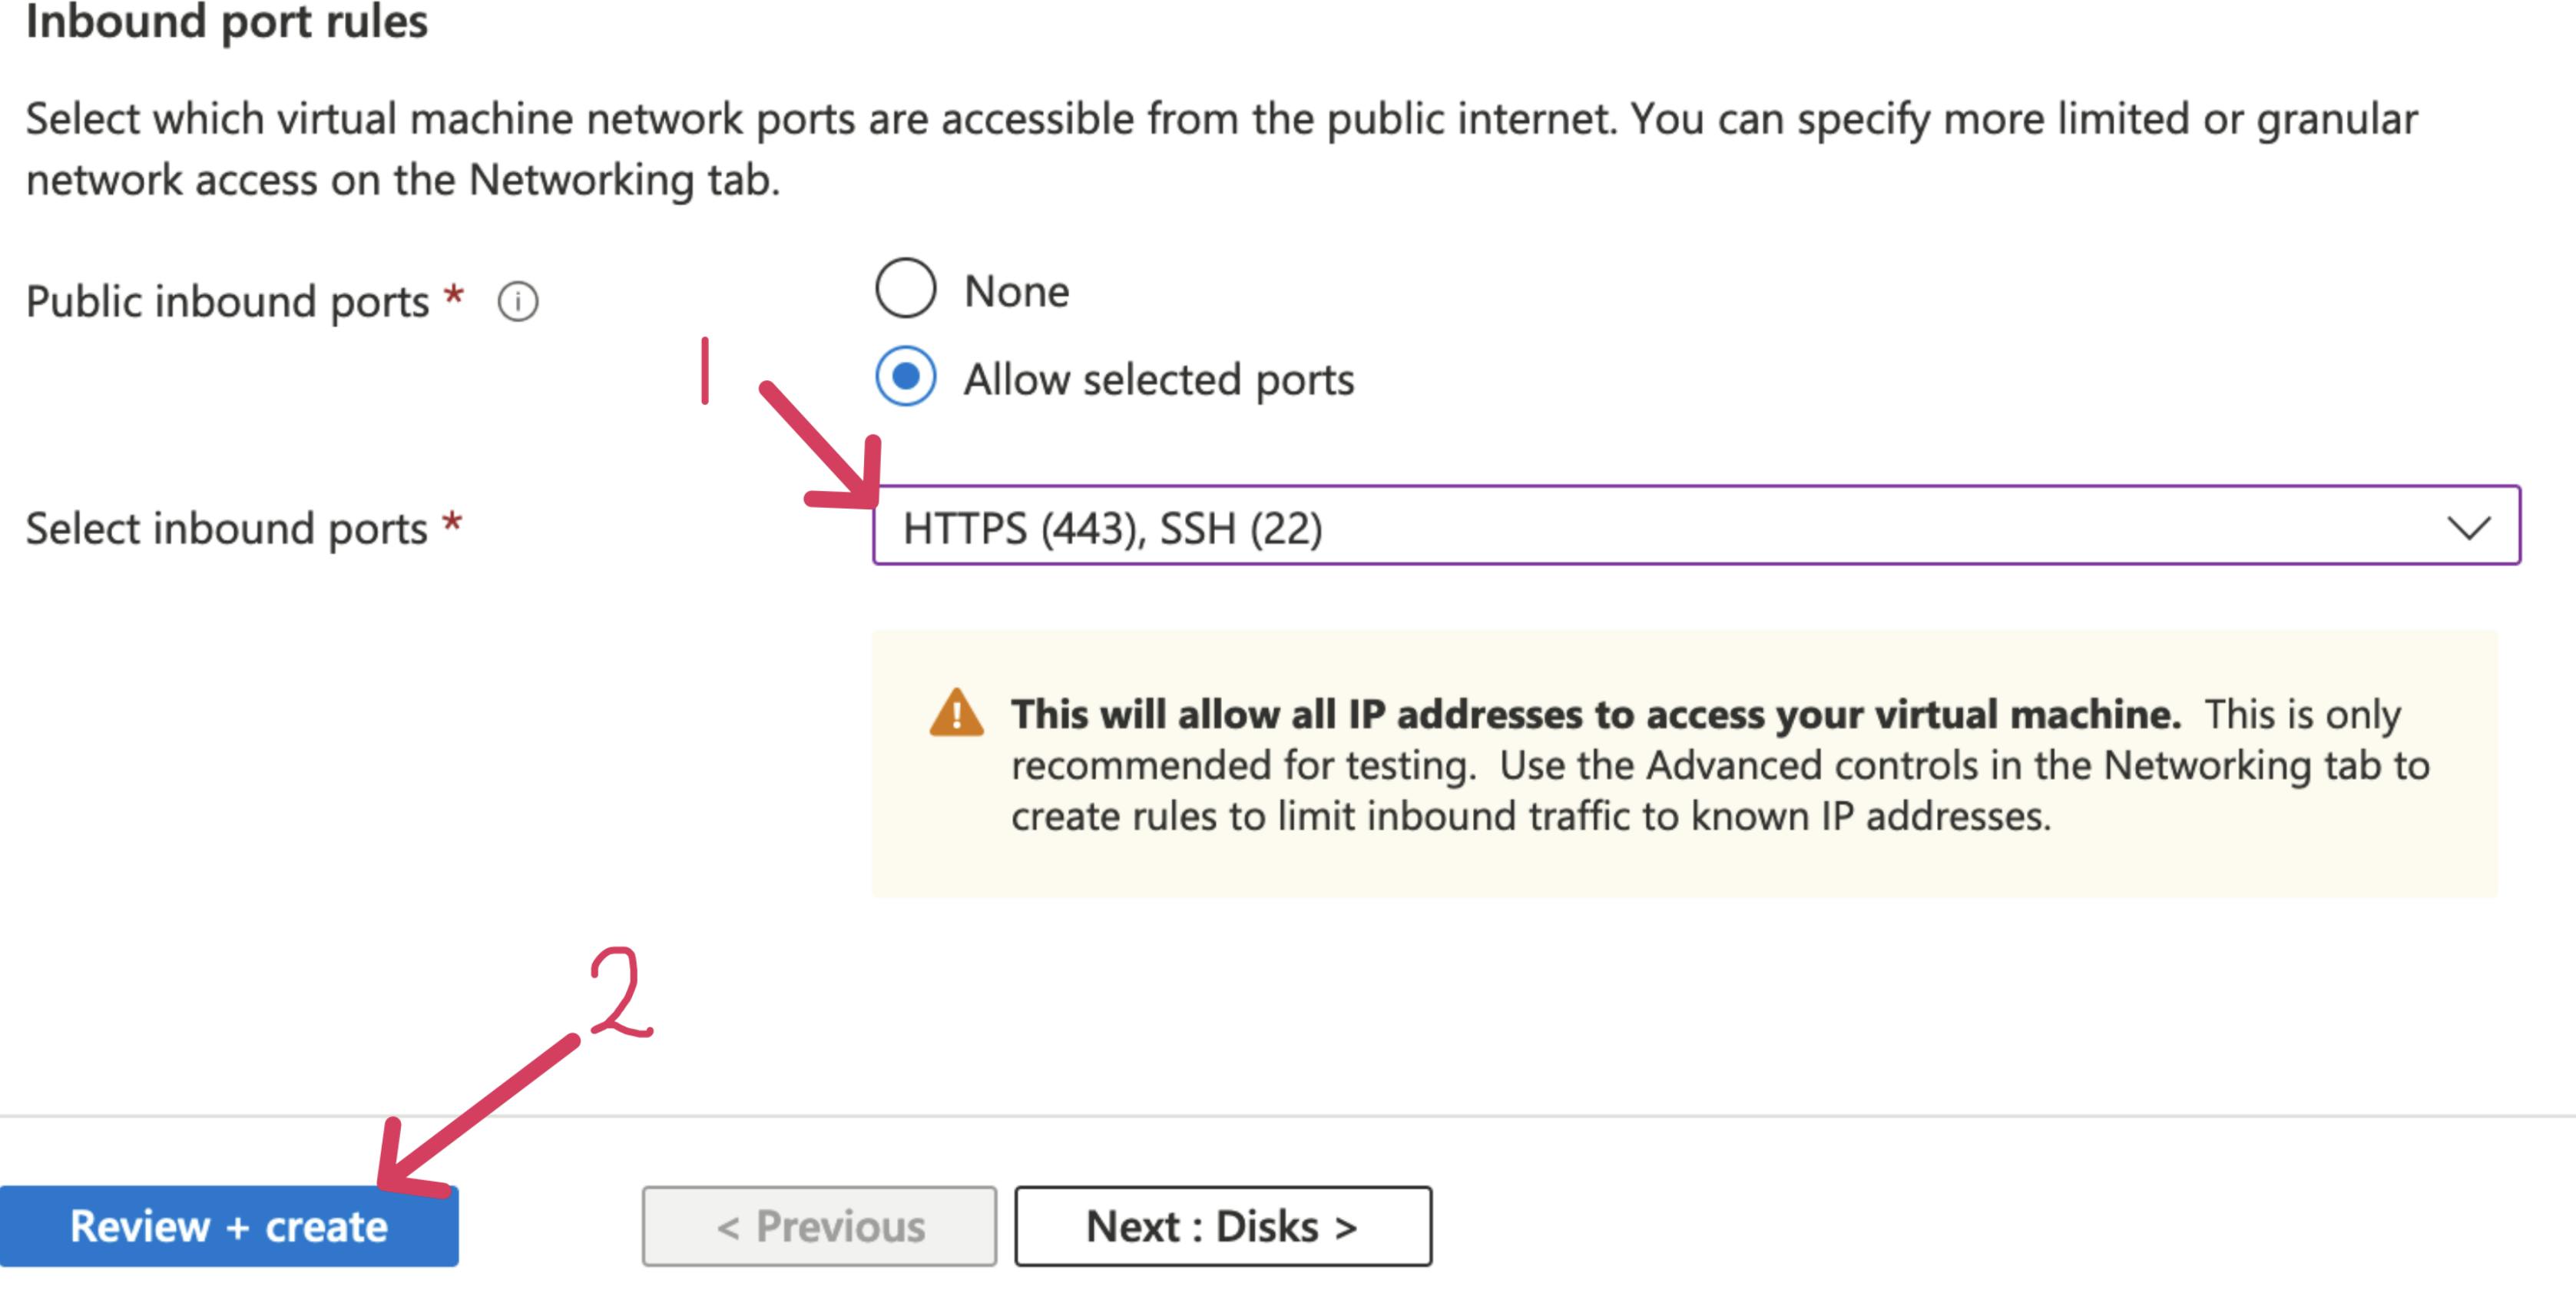
Leave the rest of the settings as default in other sections and click
Review+Create.Now, wait for the VM to be deployed. Once the VM is deployed
Click
Goto Resource.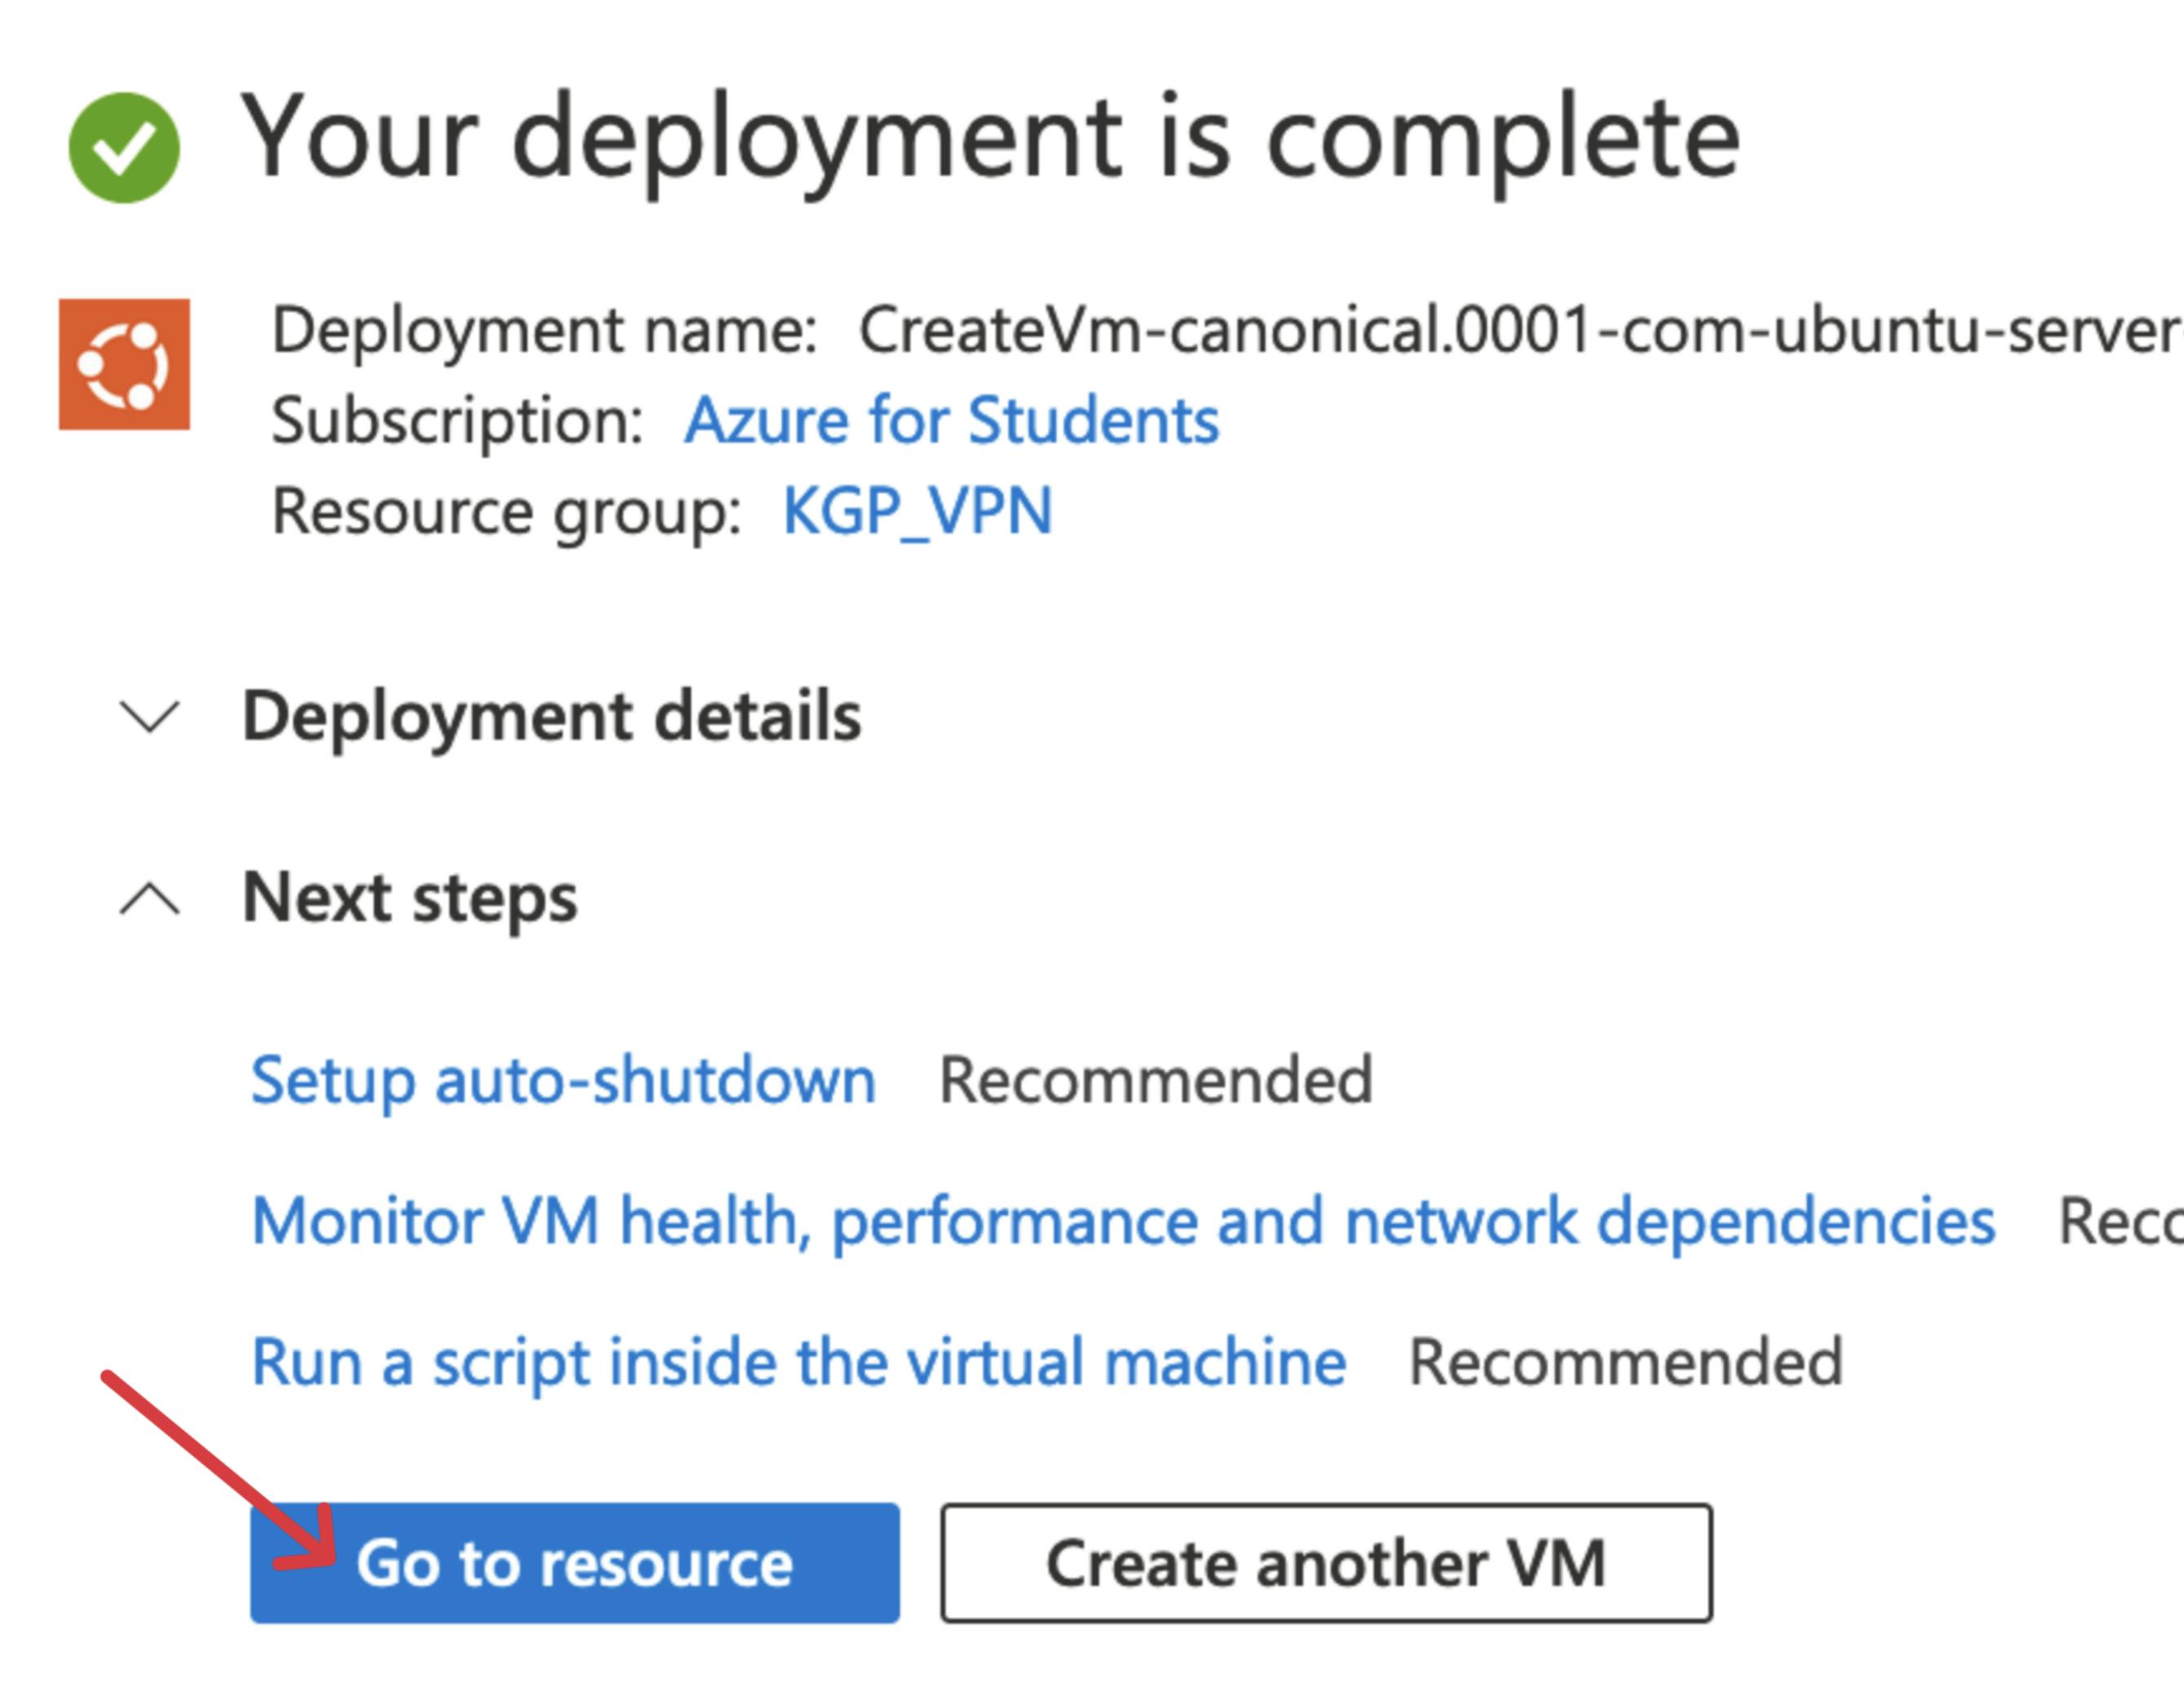
Click
Configurethe DNS option underNetworking.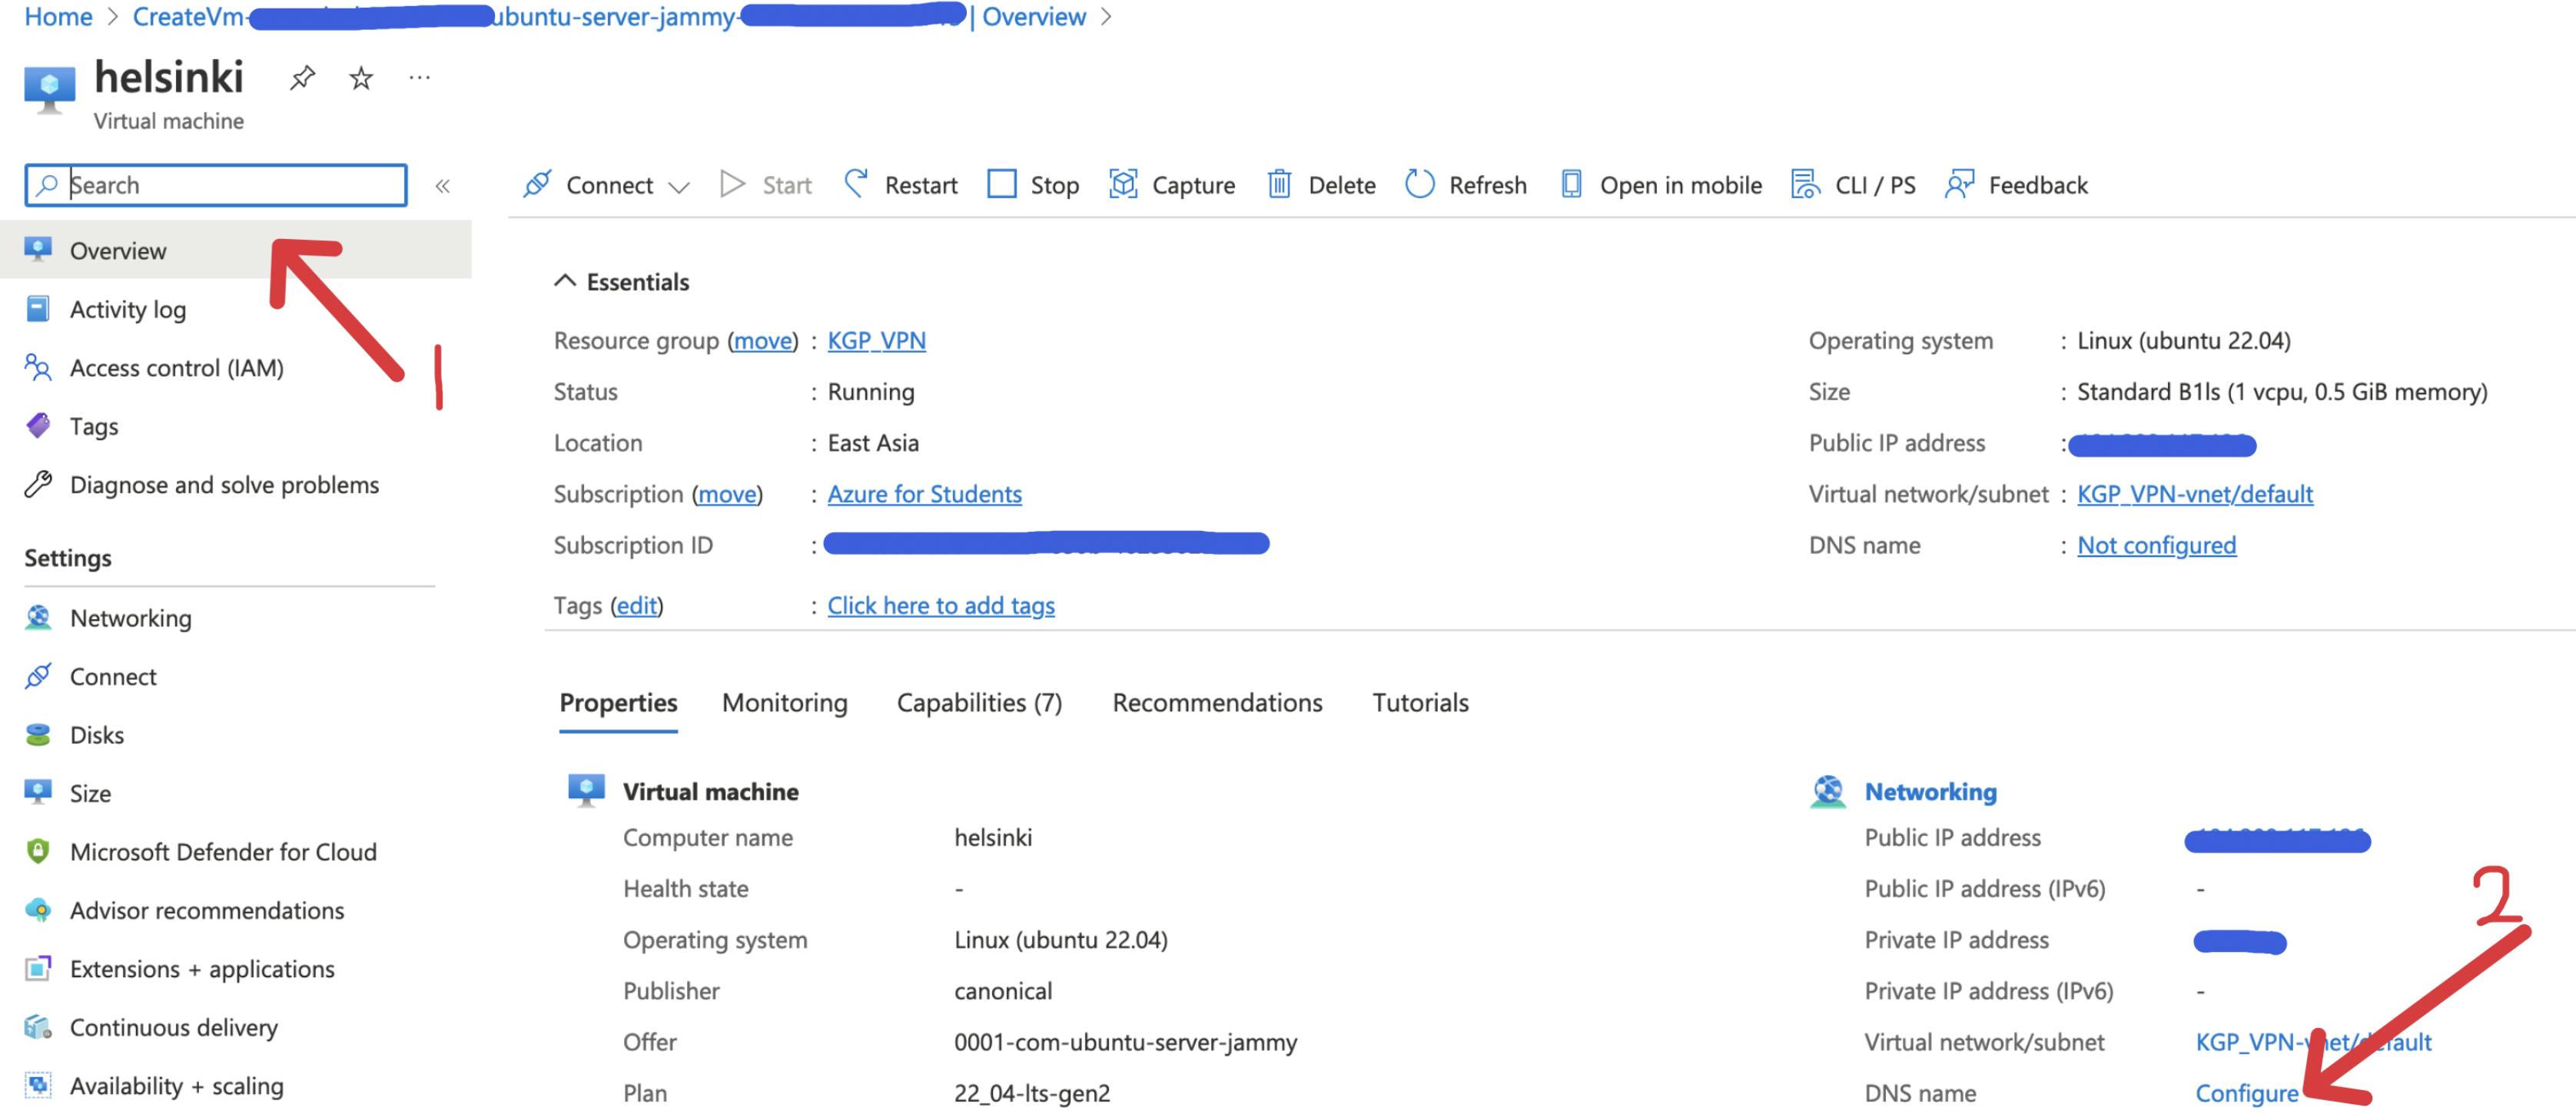
Type in any DNS name like your username in the
DNS name labelfield and pressSave.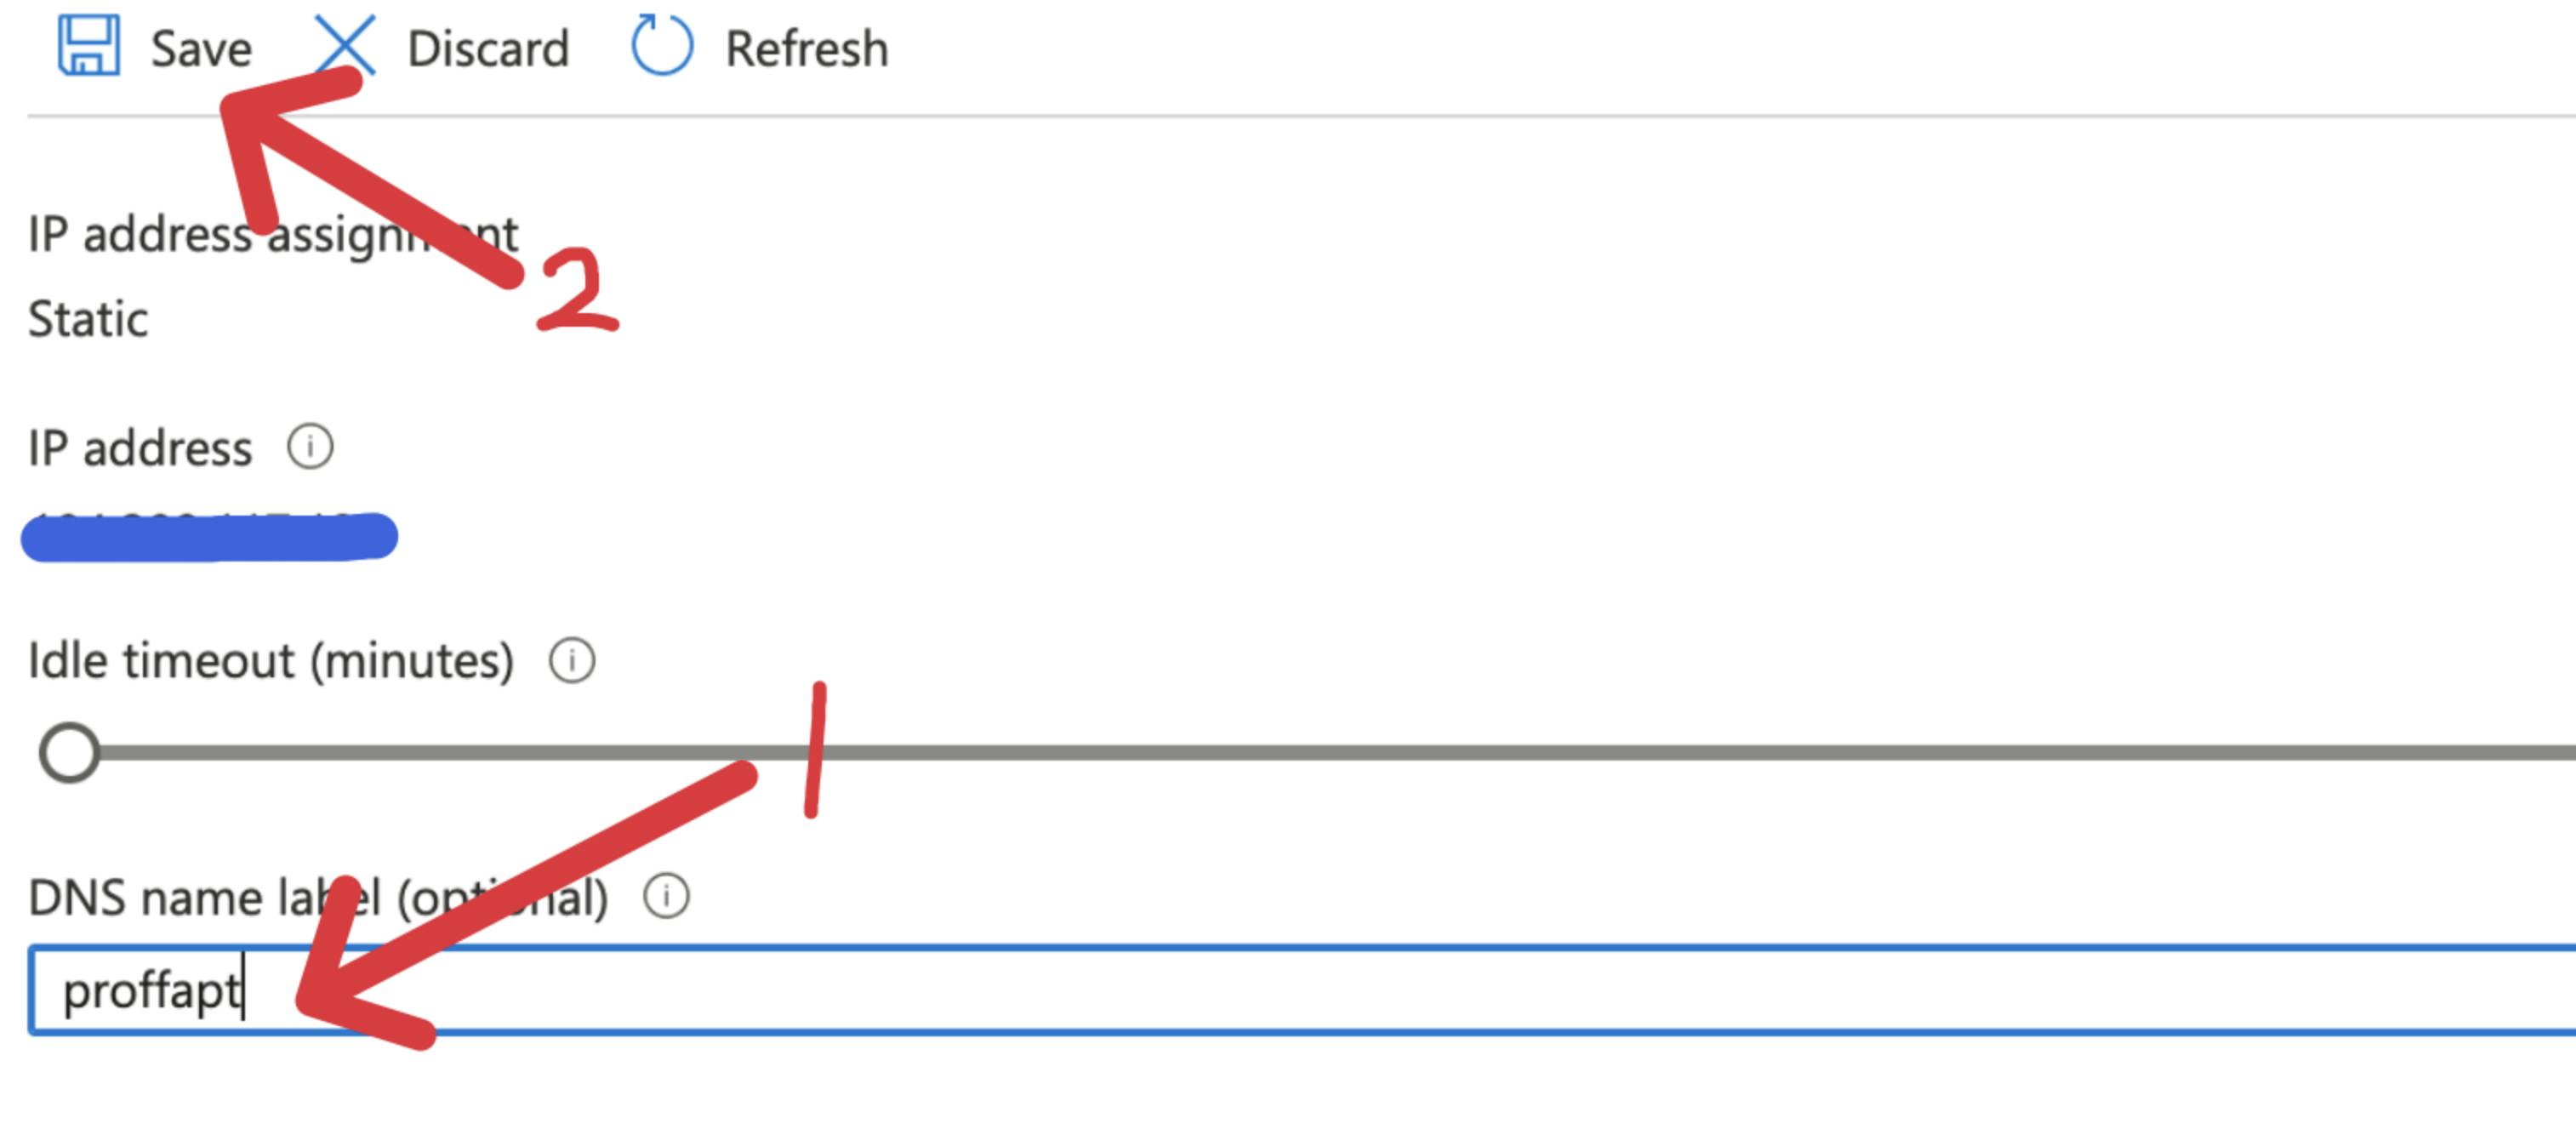
Step 3: SSH into the Remote Server
Warning
For this step, you will need to switch to a network other than that of campus as PORT 22(default port for SSH) IS BLOCKED ON THE CAMPUS NETWORK.
SSH steps are drastically different for a Windows client & a Linux/MacOS (*nix) client.
Refer to the following section to read about the steps for the client of your interest.
SSHing via a Windows machine
To make sure your PC has
SSHclient and server both installed, run the following command on Command Prompt as Administrator.Add-WindowsCapability -Online -Name OpenSSH.Client~~~~0.0.1.0 Add-WindowsCapability -Online -Name OpenSSH.Server~~~~0.0.1.0- Windows also has Powershell and the new Windows Terminal which combines all the different shell environments. So, you can choose one from these as well, but it doesn't matter in this context.
Now
sshinto the remote serverssh user@host_addressExplaining the command
user: Name of the user given while creating the virtual machine.host_address: Public IP address of the machine.
SSHing via a Linux or MacOS machine
Execute the following command, then enter your password in the prompt.
ssh user@host_addressExplaining the command
user: Name of the user given while creating the virtual machine.
host_address: Public IP address of the machine.
Step 4: Setup OpenVPN Access Server
After we have ssh'ed into the machine, we have to set up the OpenVPN Access Server.
Before that, it's a good practice to update and upgrade your system via
  sudo apt update
  sudo apt upgrade
Execute the following command
wget https://git.io/vpn -O openvpn-install.sh && sudo bash openvpn-install.shIt will download and execute a script that automates OpenVPN server configuration.
Keep in mind to update the following options during the setup process & leave the rest in their default state:
IP address: Your Public IP for the azure machine.UDP or TCP: Enter 2 for TCP as UDP ports are blocked on the campus network.PORT: 443DNS RESOLVER: Enter 4 for OpenDNS.CLIENT: One configuration for one client/device. Name it like pc, mobile, etc.
The
.ovpnfile will be stored inside/rootdirectory, copy it into your user's home directory using the following commandsudo cp /root/client_name.ovpn ~/Explaining the command
client_name: Name of the client you specified in the script.
Note
Run the same script to generate new clients (you will need a unique client for each device that’s going to be connected to the VPN), i.e., one.ovpnfile and one connection.
Configuration for Gaming
Use the TCP_NODELAY option if you are planning to use this VPN for gaming. Execute the following command on the remote VPN server
sudo echo "tcp-nodelay" | sudo tee -a /etc/openvpn/server.conf
Now restart the OpenVPN service using
sudo systemctl restart openvpn.service && sudo systemctl restart openvpn@server.service
Step 5: Download ovpn files
Now we have to transfer the .ovpn files generated on the remote server to our local machine. The steps to achieve this are different for *nix (Linux or MacOS) & Windows, refer to the following sections to read about the steps for your platform of interest.
Windows
Download WinSCP a GUI implementation for
SCP (secure copy)on windows. Open it.Click on
New Session.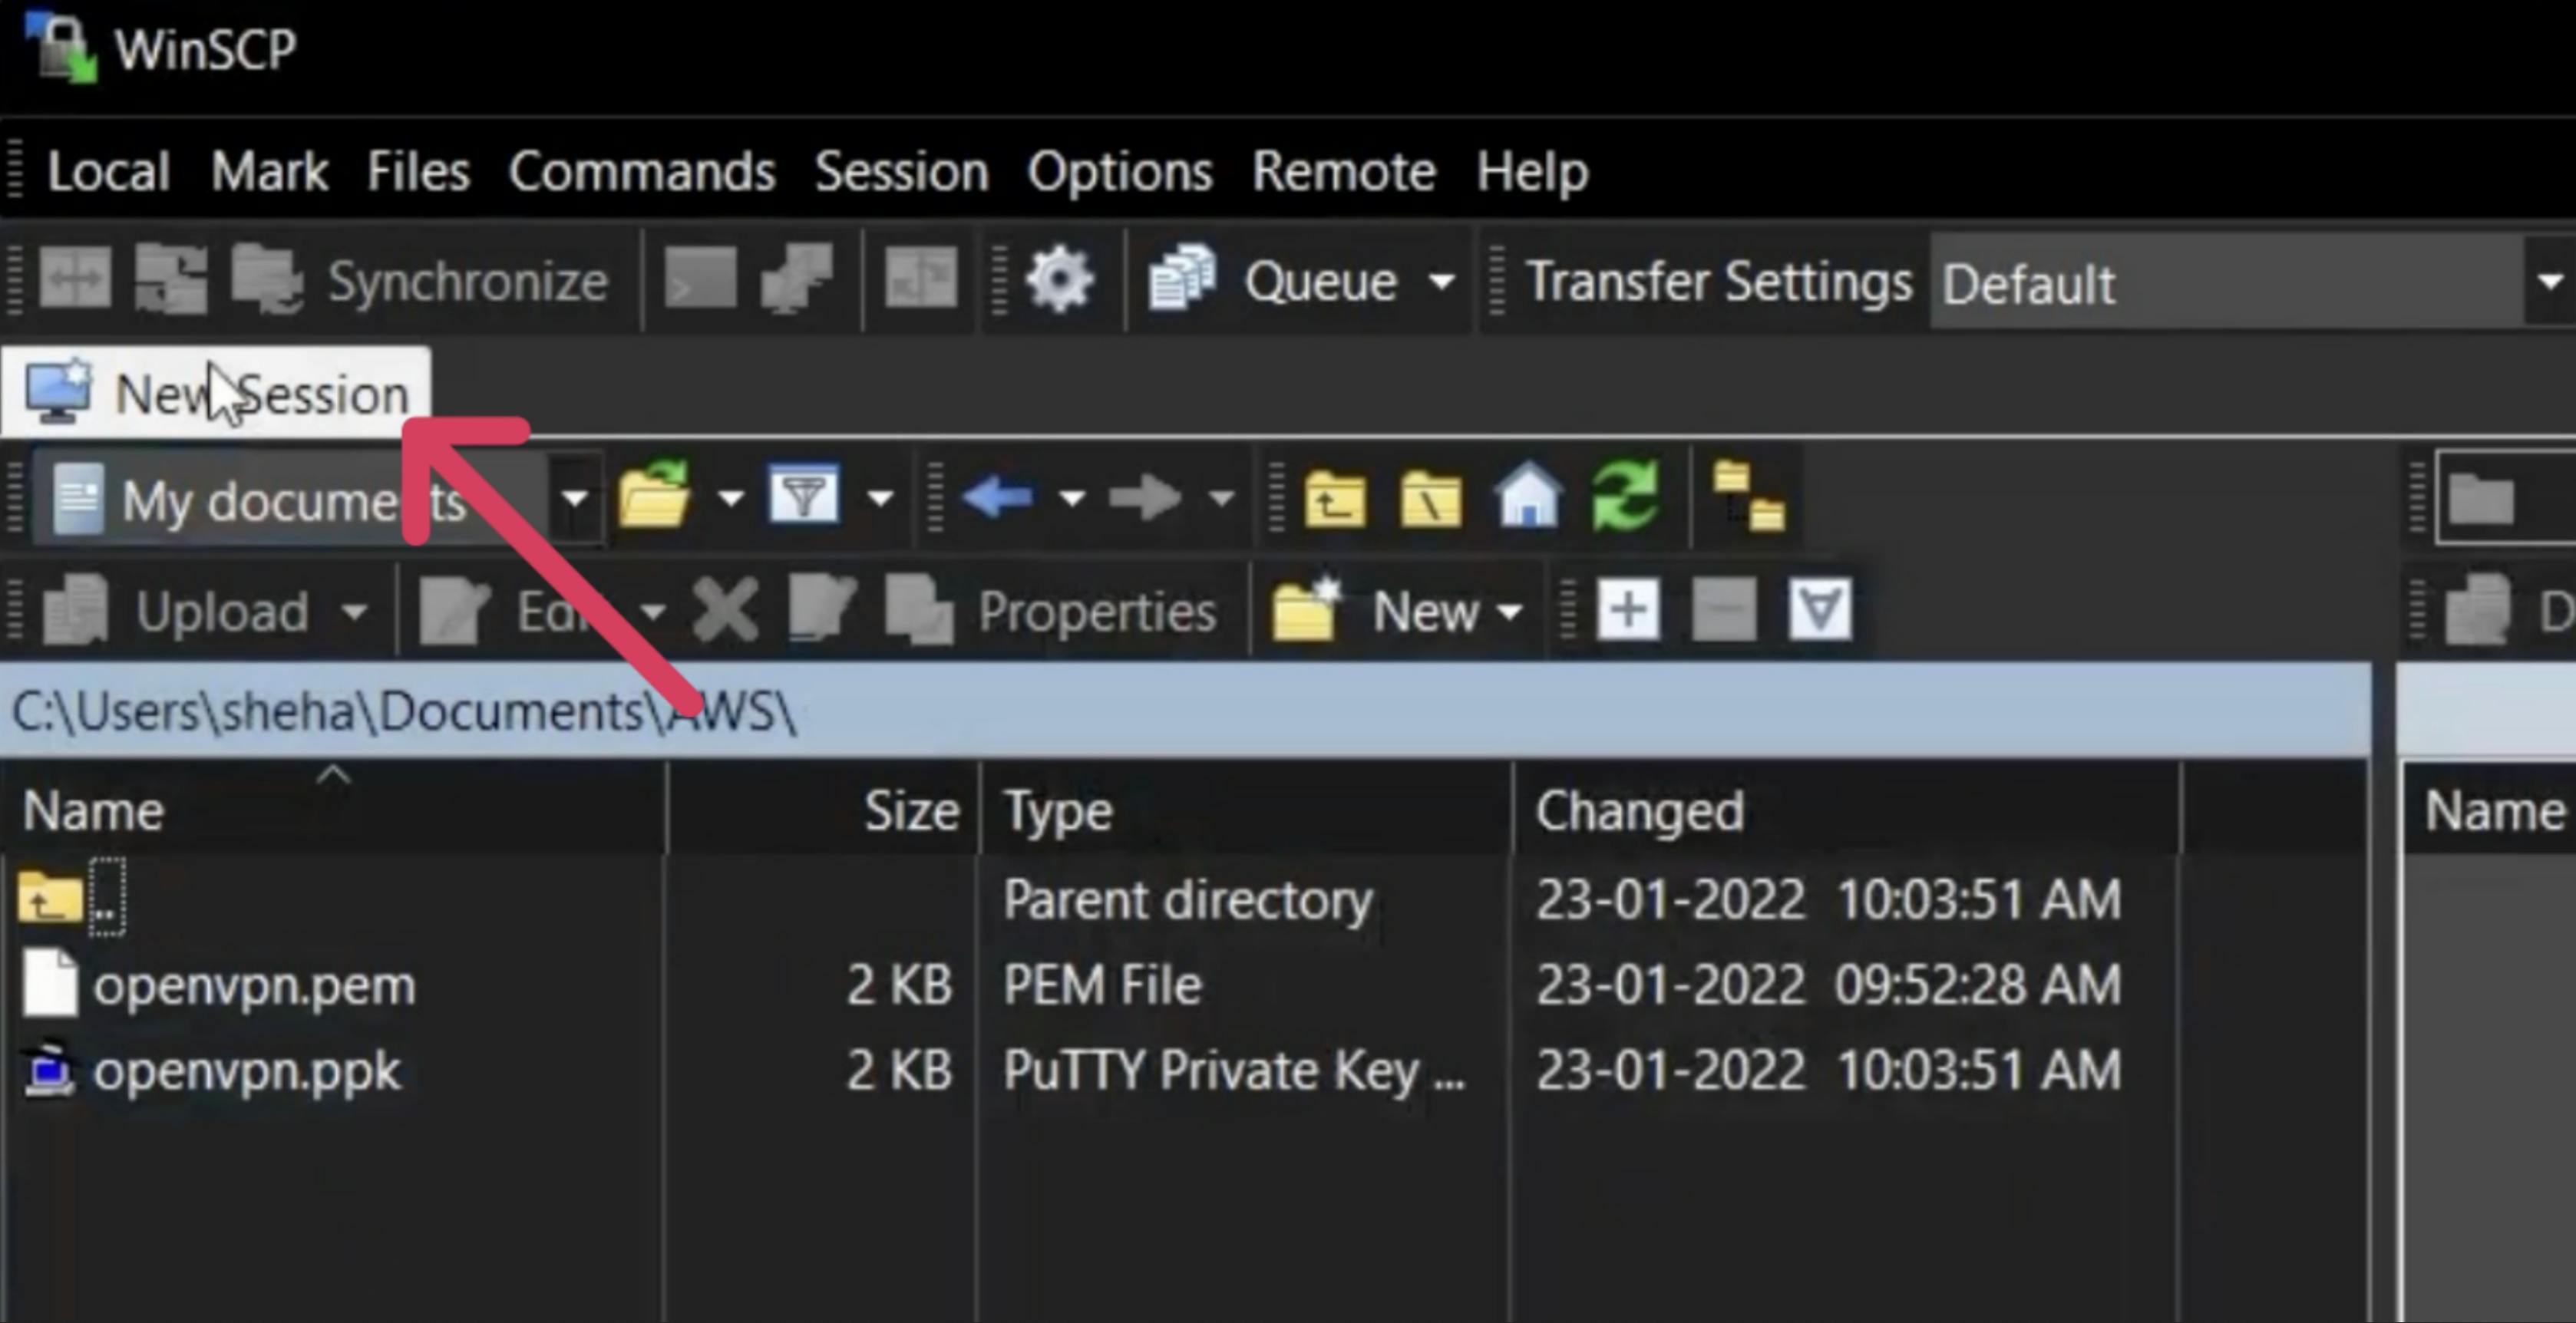
Enter the following login configuration
File Protocol: SCP.Host Name: Your remote machine's Public IP address.Port: 22 (Default).Username: The username which you set for the remote machine.Password: The password which you set for the remote machine.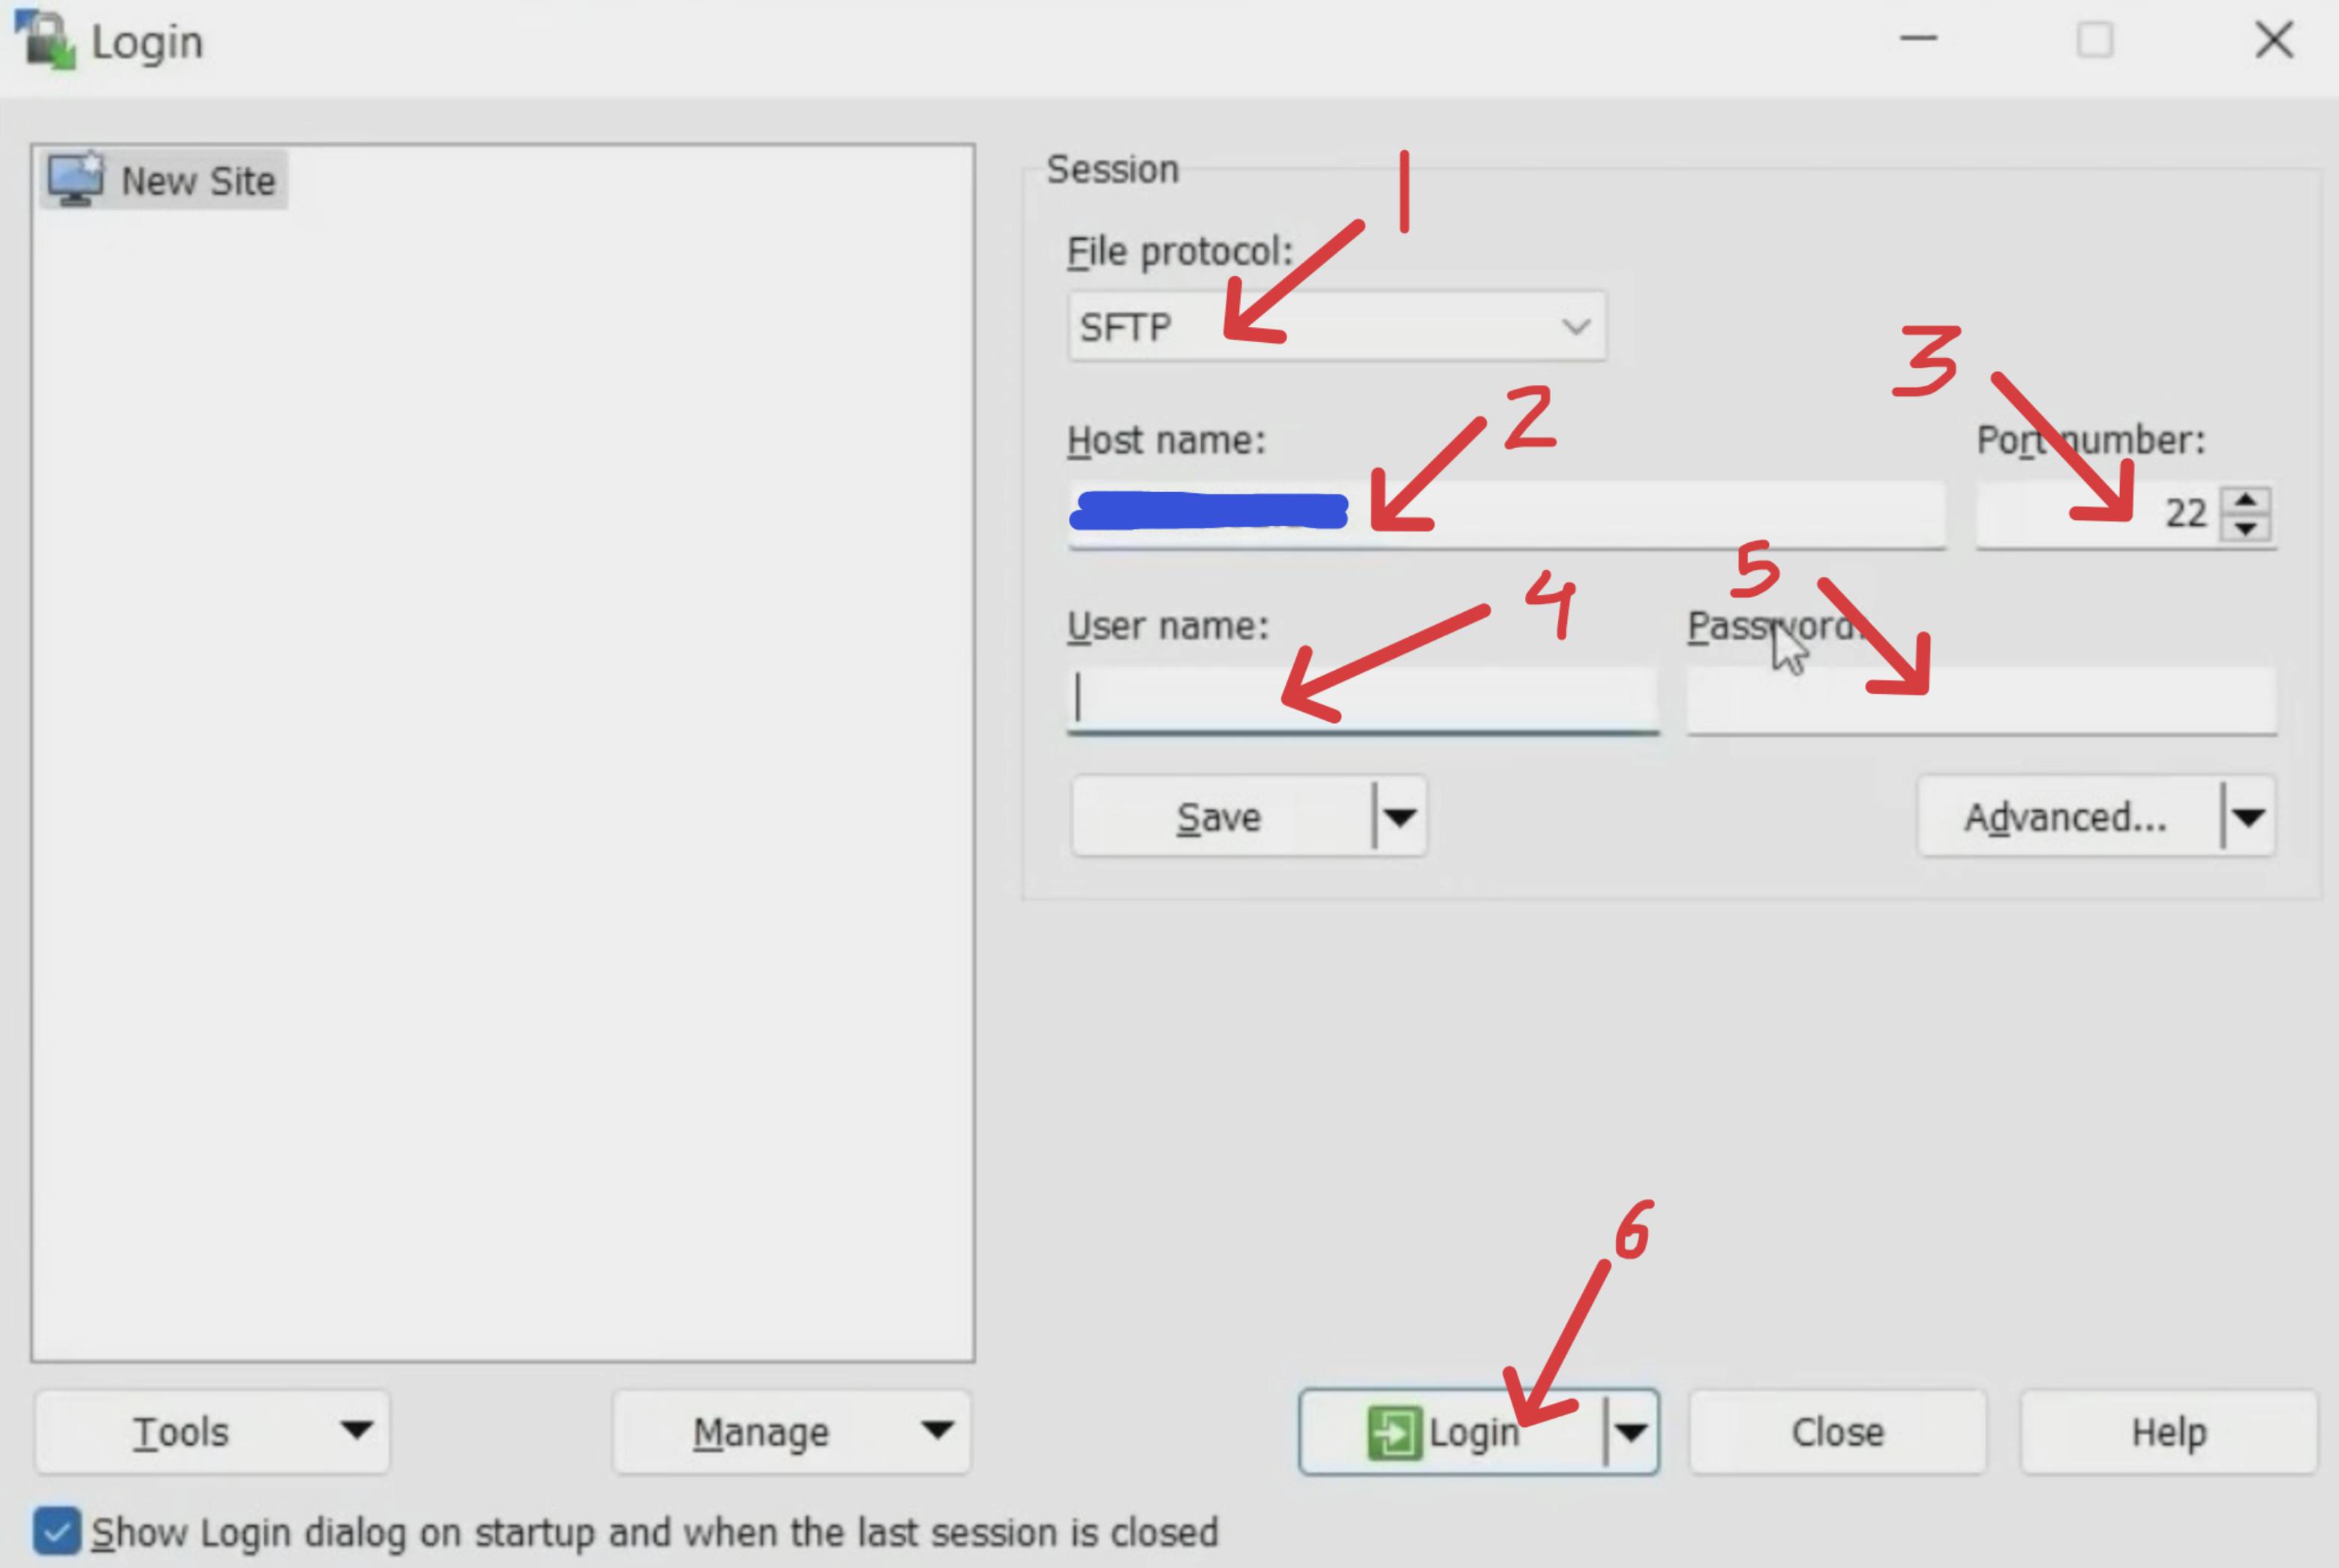
Press
LoginthenYES.
Select and download all the
.ovpnfiles you created which will be shown on the interface.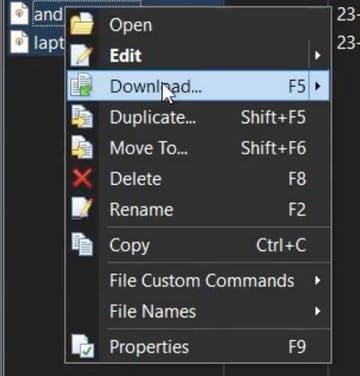
Now shut down the
WinSCP session
Linux & MacOS
Run the following command, the key will be downloaded in the Downloads directory after you enter the correct password set by you earlier.
scp user@host_address:client_name.ovpn ~/Downloads/
Explaining the command
user: Name of the user given while creating the virtual machine.
host_address: Public IP address of the machine.
client_name: Name of the client you specified in the script.
To start/stop/check the status of the OpenVPN server use systemctl:
sudo systemctl start openvpn@server.service
sudo systemctl stop openvpn@server.service
sudo systemctl status openvpn@server.service
For Android:
Follow either of the aforementioned methods and then transfer the downloaded.ovpnfile to your Android device via Telegram/Bluetooth/Mail or whatever to your android device.
Step 6: Connecting to the VPN on client devices
Android
Download the OpenVPN Connect app from Play Store. Open the app and after going through the first screen, go to the Files tab, there import the .ovpn file, and connect.
Linux & macOS
Get
OpenVPNClient.Linux
In most of the distros, you can go to the network manager and import the
.ovpnfile. If not then install OpenVPN withsudo apt install openvpn.macOS
You can either download the GUI tool, tunnelblick for importing the
.ovpnfile or download the CLI tool for OpenVPN via MacPorts or HomeBrew usingsudo ports install openvpnandbrew install openvpnrespectively.
Start the client with your configuration file
sudo openvpn --config /path/to/config.ovpnExplaining the command
/path/to/config.ovpn: It is the path to the .pem file which you downloaded just before deploying the VM.
Windows
Download the official OpenVPN Connect client for Windows, import the .ovpn file, and toggle it ON to finally connect - video guide.
Step 7: Budget Control
Warning
This is a very important step, to ensure the long-term usability of your credits.
Use only one instance.
Bandwidth is free up to $100 credits, so it's better not to waste resources on the VPN.
Note
If in any case, you have to stop an instance forcibly, do it; to be on the safer side.